
本文按照Spring入门文档 Building a RESTful Web Service 的示例,基于maven来部署应用,并整理了关于IDEA和远程调试相关的配置。
应用部署步骤
部署工程
可以直接从git拉取工程
git clone https://github.com/spring-guides/gs-rest-service.git
也可以很方便的通过手动创建maven工程
1、创建目录
mkdir -p src/main/java/hello
2、创建 pom.xml
<?xml version="1.0" encoding="UTF-8"?>
<project xmlns="http://maven.apache.org/POM/4.0.0" xmlns:xsi="http://www.w3.org/2001/XMLSchema-instance"
    xsi:schemaLocation="http://maven.apache.org/POM/4.0.0 http://maven.apache.org/xsd/maven-4.0.0.xsd">
    <modelVersion>4.0.0</modelVersion>

    <groupId>org.springframework</groupId>
    <artifactId>gs-rest-service</artifactId>
    <packaging>jar</packaging>
    <version>0.1.0</version>

    <parent>
        <groupId>org.springframework.boot</groupId>
        <artifactId>spring-boot-starter-parent</artifactId>
        <version>1.2.5.RELEASE</version>
    </parent>

    <dependencies>
        <dependency>
            <groupId>org.springframework.boot</groupId>
            <artifactId>spring-boot-starter-web</artifactId>
        </dependency>
    </dependencies>

    <properties>
        <java.version>1.8</java.version>
    </properties>


    <build>
        <plugins>
            <plugin>
                <groupId>org.springframework.boot</groupId>
                <artifactId>spring-boot-maven-plugin</artifactId>
            </plugin>
        </plugins>
    </build>

    <repositories>
        <repository>
            <id>spring-releases</id>
            <url>https://repo.spring.io/libs-release</url>
        </repository>
    </repositories>
    <pluginRepositories>
        <pluginRepository>
            <id>spring-releases</id>
            <url>https://repo.spring.io/libs-release</url>
        </pluginRepository>
    </pluginRepositories>
</project>
新增处理请求的类
添加资源展示类 src/main/java/hello/Greeting.java
package hello;

public class Greeting {

    private final long id;
    private final String content;

    public Greeting(long id, String content) {
        this.id = id;
        this.content = content;
    }

    public long getId() {
        return id;
    }

    public String getContent() {
        return content;
    }
}
添加资源控制器 src/main/java/hello/GreetingController.java
package hello;

import java.util.concurrent.atomic.AtomicLong;
import org.springframework.web.bind.annotation.RequestMapping;
import org.springframework.web.bind.annotation.RequestParam;
import org.springframework.web.bind.annotation.RestController;

@RestController
public class GreetingController {

    private static final String template = "Hello, %s!";
    private final AtomicLong counter = new AtomicLong();

    @RequestMapping("/greeting")
    public Greeting greeting(@RequestParam(value="name", defaultValue="World") String name) {
        return new Greeting(counter.incrementAndGet(),
                            String.format(template, name));
    }
}
注意:
@RestController是Spring4新添加的注解,表示@Controllerand@ResponseBody一起使用。@ResponseBody告诉Spring不用把结果以服务端页面的形式展现,而是直接将对象转换为json串结果返回。
例子还可以写成:
package hello;

import java.util.concurrent.atomic.AtomicLong;
import org.springframework.web.bind.annotation.RequestMapping;
import org.springframework.web.bind.annotation.RequestParam;
import org.springframework.web.bind.annotation.RestController;
import org.springframework.stereotype.Controller;

@Controller
public class GreetingController {

    private static final String template = "Hello, %s!";
    private final AtomicLong counter = new AtomicLong();

    @RequestMapping("/greeting")
    public @ResponseBody Greeting greeting(@RequestParam(value="name", defaultValue="World") String name) {
        return new Greeting(counter.incrementAndGet(),
                            String.format(template, name));
    }
}
添加应用可执行类 src/main/java/hello/Application.java
package hello;

import java.util.Arrays;

import org.springframework.boot.SpringApplication;
import org.springframework.boot.autoconfigure.SpringBootApplication;
import org.springframework.context.ApplicationContext;

@SpringBootApplication
public class Application {

    public static void main(String[] args) {
        ApplicationContext ctx = SpringApplication.run(Application.class, args);

        System.out.println("Let's inspect the beans provided by Spring Boot:");

        String[] beanNames = ctx.getBeanDefinitionNames();
        Arrays.sort(beanNames);
        for (String beanName : beanNames) {
            System.out.println(beanName);
        }
    }
}
应用启动后会打印出Beans列表:
Let's inspect the beans provided by Spring Boot:
application
basicErrorController
beanNameHandlerMapping
beanNameViewResolver
characterEncodingFilter
defaultServletHandlerMapping
defaultViewResolver
dispatcherServlet
dispatcherServletRegistration
embeddedServletContainerCustomizerBeanPostProcessor
error
errorAttributes
faviconHandlerMapping
faviconRequestHandler
greetingController
handlerExceptionResolver
hiddenHttpMethodFilter
http.mappers.CONFIGURATION_PROPERTIES
httpRequestHandlerAdapter
jacksonObjectMapper
jacksonObjectMapperBuilder
mappingJackson2HttpMessageConverter
mbeanExporter
mbeanServer
messageConverters
multipart.CONFIGURATION_PROPERTIES
multipartConfigElement
multipartResolver
mvcContentNegotiationManager
mvcConversionService
mvcPathMatcher
mvcResourceUrlProvider
mvcUriComponentsContributor
mvcUrlPathHelper
mvcValidator
mvcViewResolver
objectNamingStrategy
org.springframework.boot.autoconfigure.AutoConfigurationPackages
org.springframework.boot.autoconfigure.PropertyPlaceholderAutoConfiguration
org.springframework.boot.autoconfigure.condition.BeanTypeRegistry
org.springframework.boot.autoconfigure.jackson.JacksonAutoConfiguration
org.springframework.boot.autoconfigure.jackson.JacksonAutoConfiguration$JacksonObjectMapperBuilderConfiguration
org.springframework.boot.autoconfigure.jackson.JacksonAutoConfiguration$JacksonObjectMapperConfiguration
org.springframework.boot.autoconfigure.jmx.JmxAutoConfiguration
org.springframework.boot.autoconfigure.web.DispatcherServletAutoConfiguration
org.springframework.boot.autoconfigure.web.DispatcherServletAutoConfiguration$DispatcherServletConfiguration
org.springframework.boot.autoconfigure.web.EmbeddedServletContainerAutoConfiguration
org.springframework.boot.autoconfigure.web.EmbeddedServletContainerAutoConfiguration$EmbeddedTomcat
org.springframework.boot.autoconfigure.web.ErrorMvcAutoConfiguration
org.springframework.boot.autoconfigure.web.ErrorMvcAutoConfiguration$WhitelabelErrorViewConfiguration
org.springframework.boot.autoconfigure.web.HttpEncodingAutoConfiguration
org.springframework.boot.autoconfigure.web.HttpMessageConvertersAutoConfiguration
org.springframework.boot.autoconfigure.web.HttpMessageConvertersAutoConfiguration$StringHttpMessageConverterConfiguration
org.springframework.boot.autoconfigure.web.JacksonHttpMessageConvertersConfiguration
org.springframework.boot.autoconfigure.web.JacksonHttpMessageConvertersConfiguration$MappingJackson2HttpMessageConverterConfiguration
org.springframework.boot.autoconfigure.web.MultipartAutoConfiguration
org.springframework.boot.autoconfigure.web.ServerPropertiesAutoConfiguration
org.springframework.boot.autoconfigure.web.WebMvcAutoConfiguration
org.springframework.boot.autoconfigure.web.WebMvcAutoConfiguration$EnableWebMvcConfiguration
org.springframework.boot.autoconfigure.web.WebMvcAutoConfiguration$WebMvcAutoConfigurationAdapter
org.springframework.boot.autoconfigure.web.WebMvcAutoConfiguration$WebMvcAutoConfigurationAdapter$FaviconConfiguration
org.springframework.boot.autoconfigure.websocket.WebSocketAutoConfiguration
org.springframework.boot.autoconfigure.websocket.WebSocketAutoConfiguration$TomcatWebSocketConfiguration
org.springframework.boot.context.properties.ConfigurationPropertiesBindingPostProcessor
org.springframework.boot.context.properties.ConfigurationPropertiesBindingPostProcessor.store
org.springframework.context.annotation.ConfigurationClassPostProcessor.enhancedConfigurationProcessor
org.springframework.context.annotation.ConfigurationClassPostProcessor.importAwareProcessor
org.springframework.context.annotation.internalAutowiredAnnotationProcessor
org.springframework.context.annotation.internalCommonAnnotationProcessor
org.springframework.context.annotation.internalConfigurationAnnotationProcessor
org.springframework.context.annotation.internalRequiredAnnotationProcessor
propertySourcesPlaceholderConfigurer
requestContextListener
requestMappingHandlerAdapter
requestMappingHandlerMapping
resourceHandlerMapping
serverProperties
simpleControllerHandlerAdapter
spring.http.encoding.CONFIGURATION_PROPERTIES
spring.jackson.CONFIGURATION_PROPERTIES
spring.mvc.CONFIGURATION_PROPERTIES
spring.resources.CONFIGURATION_PROPERTIES
stringHttpMessageConverter
tomcatEmbeddedServletContainerFactory
viewControllerHandlerMapping
viewResolver
websocketContainerCustomizer
可以看到org.springframework.boot.autoconfigure和tomcatEmbeddedServletContainerFactory等Beans。
部署
cd gs-rest-service/initial- 在本地Repository中安装jar
mvn install
如果提示java版本出错,则打开pom.xml把java.version改成相应的jdk版本。
执行
直接执行
java -jar ./target/gs-rest-service-0.1.0.jar
这样,当访问 http://localhost:8080/greeting?name=suninf 时,页面(接口)返回 {"id":1,"content":"Hello, suninf!"}。
使用IDEA执行或调试
IDEA,导入maven工程,在[Run/Debug]选择栏,可以直接执行Run或Debug。
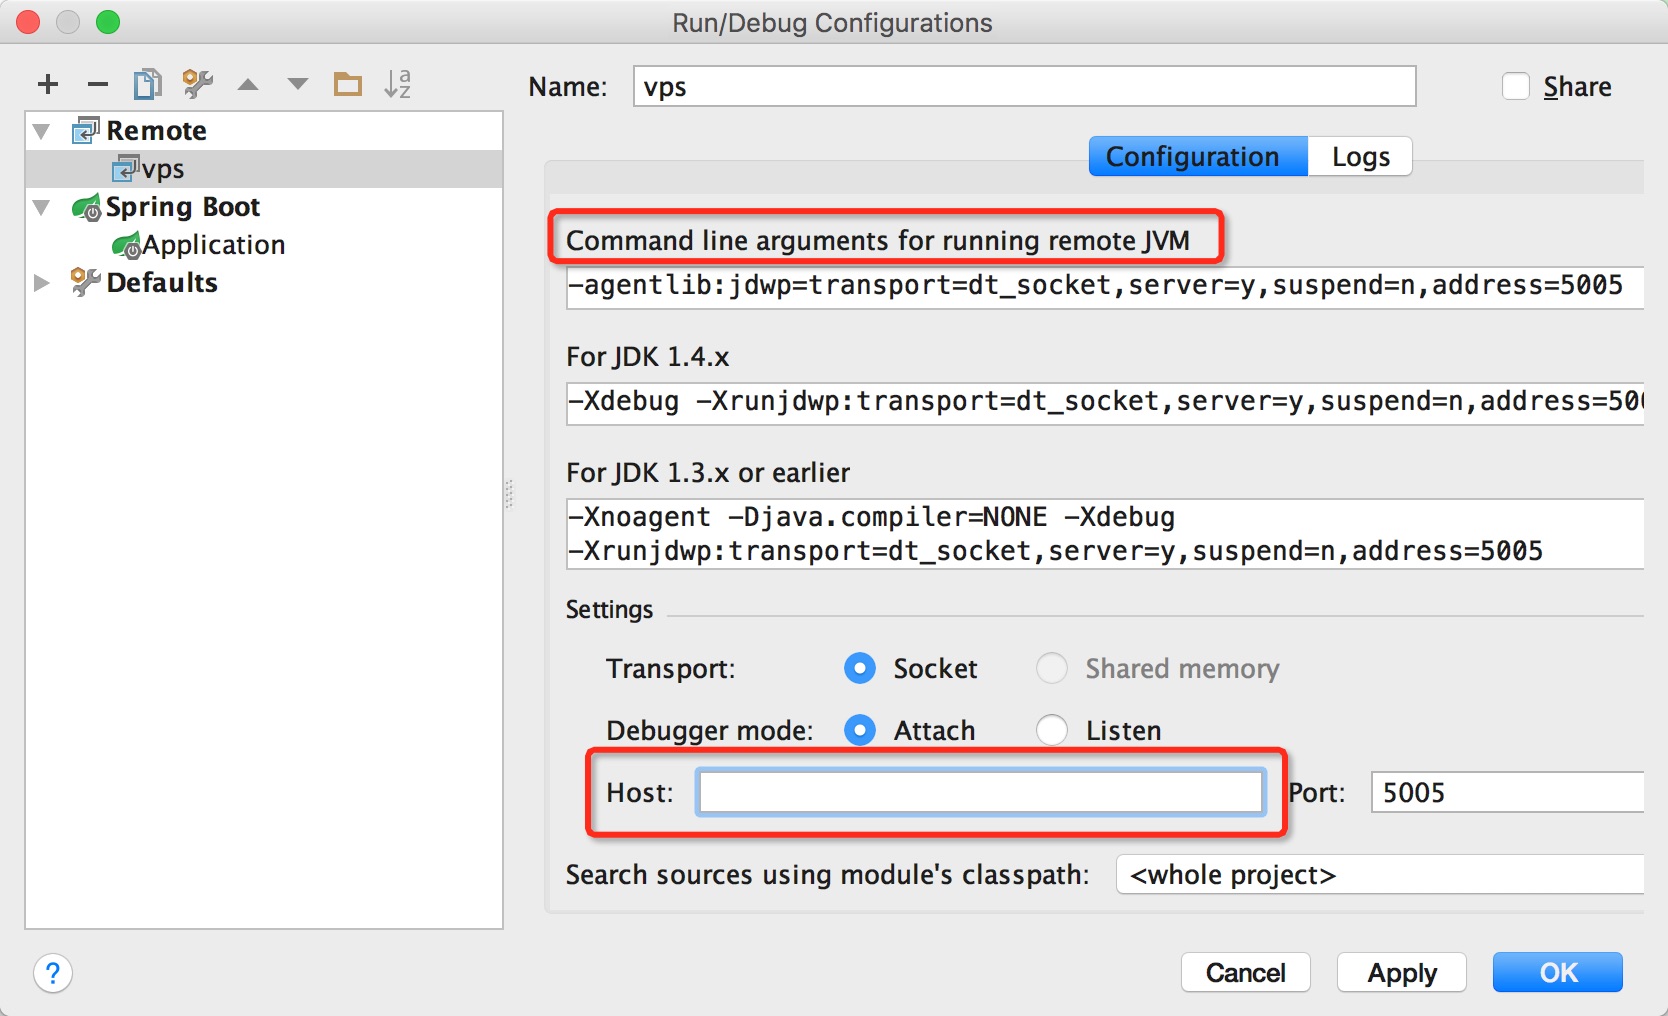
远程调试
1、命令行以远程调试方式执行,执行后会等着调试器来连接:
java -agentlib:jdwp=transport=dt_socket,server=y,suspend=n,address=5005 -jar xxx.jar
2、IDEA,导入maven工程,在[Run/Debug]编辑栏,添加远程调试,填上ip,端口默认就是5005,即可下断点调试了。
设置窗口如图:
打jar包执行
由于pom.xml中已经添加了插件”org.springframework.boot:spring-boot-maven-plugin”:
    <build>
        <plugins>
            <plugin>
                <groupId>org.springframework.boot</groupId>
                <artifactId>spring-boot-maven-plugin</artifactId>
            </plugin>
        </plugins>
    </build>
在执行mvn install或mvn package命令后,会在target目录下生成gs-rest-service-0.1.0.jar文件,可以通过java -jar来直接部署应用。
关于war打包与执行
war打包
- 将packaging参数改成war:
<packaging>war</packaging> - 再执行
mvn package,会在target目录下生成war文件
war执行
java -jar ./target/gs-rest-service-0.1.0.war 执行
war可部署到tomcat
在pom.xml的dependencies节点,添加依赖:
<dependency>
    <groupId>org.springframework.boot</groupId>
    <artifactId>spring-boot-starter-tomcat</artifactId>
    <scope>provided</scope>
</dependency>
关于端口号的修改
在根目录下增加 application.properties 文件,添加配置:
server.port=9000